How to Install WordPress on Namecheap: A 2025 Beginner's Guide (With Screenshots)
Just signed up with Namecheap? Follow this simple, step-by-step guide with screenshots to install WordPress and get your blog live in under 10 minutes.
TOOLS & RESOURCES
10/8/20254 min read
So, you’ve taken the exciting leap and signed up for your Namecheap hosting account. Huge congratulations! I remember that feeling so well. It’s a powerful mix of "I did it!" and "Okay... what now?"
A whole new world just opened its door to you. It’s that moment you realize this huge, mysterious thing—building a website—is actually within your reach. I felt a surge of pride, like I’d finally been let in on a secret.
But let's be real, that excitement often walks right alongside a little bit of fear. I was there, too. My fear wasn't about one wrong click, but about the bigger picture: Was I choosing the right path? I actually avoided WordPress at first, convinced I needed something "more advanced." I spent hours researching how to structure everything perfectly, my anxiety growing with each new option.
What I learned—and what I want you to know—is that the fear loses its power the moment you take action. The path becomes clear only when you start walking.
And the best first step you can take is to install WordPress. It’s the simplest, most powerful way to build your blog, and I’ll show you exactly how to do it, safely and confidently.
In less than 10 minutes, you’ll have WordPress installed and be ready to start designing and writing. No technical skills required. Let’s turn that blank slate into your new blog.
What You’ll Accomplish in This Guide
By the time we're finished, you'll have:
Installed the free WordPress software on your Namecheap hosting.
Have a live, functioning website.
Gained access to your WordPress dashboard—the control center for your entire blog.
The Simple 3-Step Process to Install WordPress
Think of this process like using a vending machine. You don’t need to build the machine; you just need to know which buttons to press to get your snack. Namecheap has already built the "vending machine" (the one-click installer). We're just going to press the right buttons.
Step 1: Find the "One-Click Installer" in Your Dashboard
Log in to your Namecheap account and go to your Account Dashboard.
On the left sidebar, find and click on "Hosting List".
Next to your active hosting plan, click the "Manage" button.
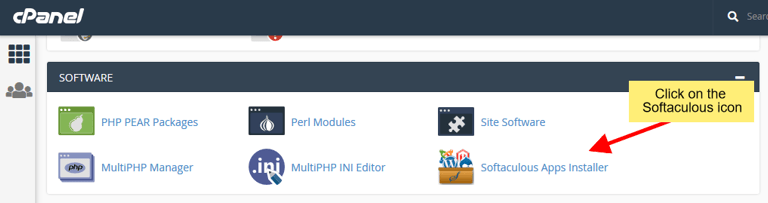
Look for the "Softaculous Apps Installer" icon in your cPanel dashboard.
This opens your cPanel (your hosting control panel). Scroll down to the "SOFTWARE" section and click on the "Softaculous Apps Installer" icon.
Step 2: Install WordPress with a Few Clicks
Inside Softaculous, you’ll see a search bar at the top. Type in "WordPress". Alternatively, you can find it under the "Blogs" category. Click on the WordPress icon.
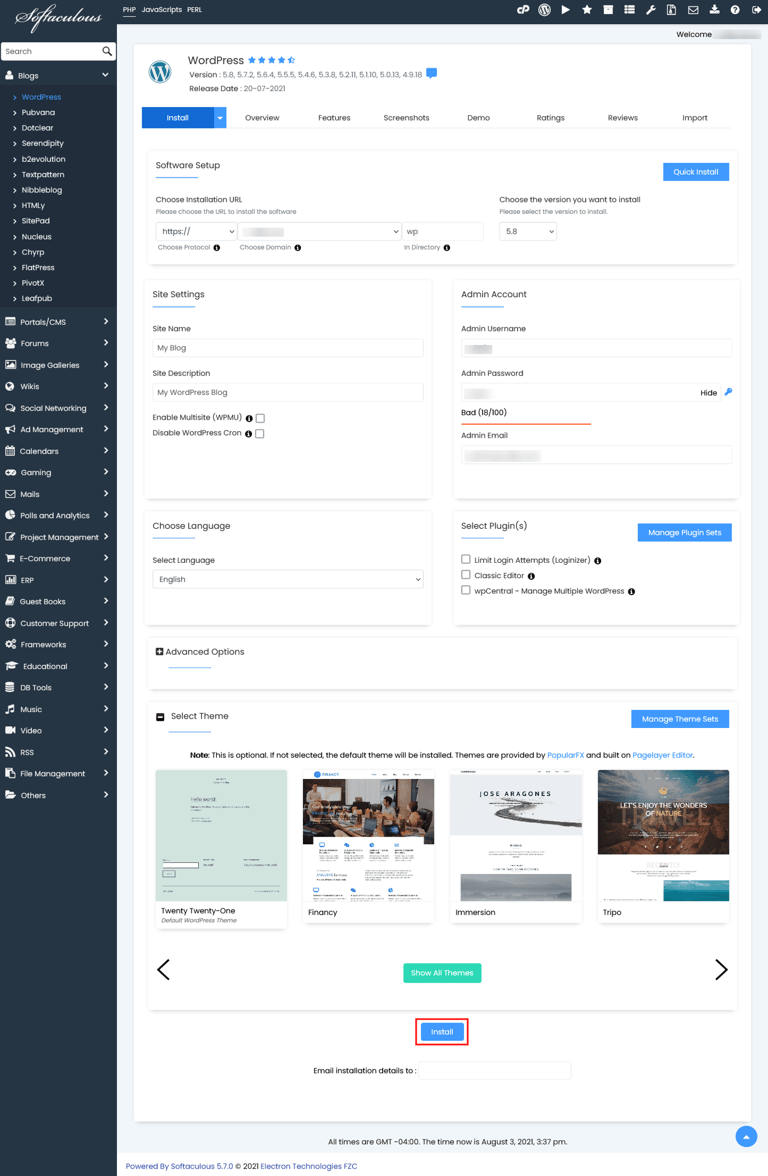
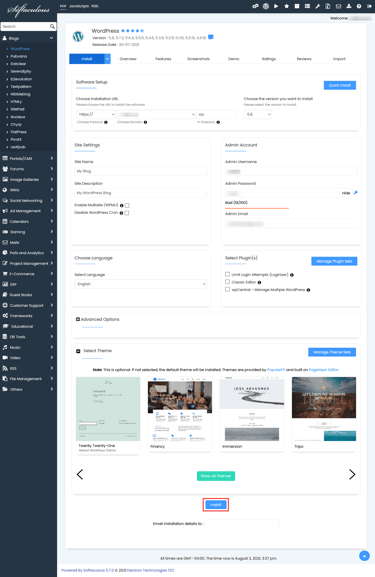
You’ll now see the WordPress information page. Click the big, blue "Install" button.
The WordPress installation form. You only need to fill in a few fields.
Now, you’ll see the installation form. I won't lie, it can look a little overwhelming at first glance with all these fields.
Take a deep breath. I promise it's simpler than it looks. We are only going to focus on a few key sections together. You can confidently ignore the rest for now.Choose Protocol: Leave this as https://.
Choose Domain: Select your domain from the dropdown menu.
In Directory: Leave this blank. This ensures your blog appears at www.yourblog.com, not www.yourblog.com/wordpress.
Site Name: Enter your blog’s name here! (This is the fun part).
Site Description: Write a short tagline for your blog.
Admin Username, Password, and Email: Crucial! Fill these in with your details. This creates your login for WordPress. Write these down somewhere safe!
Step 3: Celebrate – Your Blog is Live!
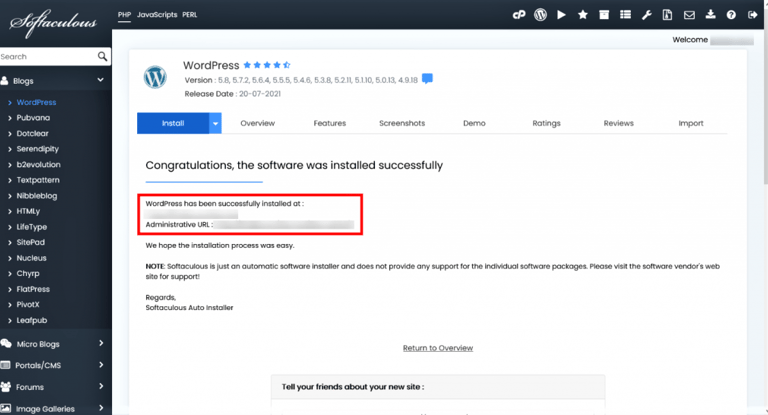
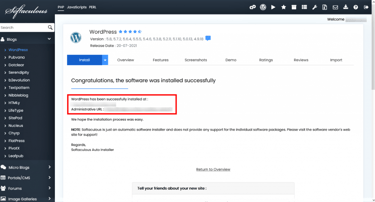
The installation will take less than a minute. When it’s done, you’ll see a "Congratulations, the software was installed successfully" screen.
The success screen you'll see. Your blog is officially live!
Important: Bookmark the two important links on this page:
Your Site URL: https://yourblog.com (This is your live blog!)
Administrative URL: https://yourblog.com/wp-admin (This is your login page)
What to Do Next: Your First Look at WordPress
Click on your Administrative URL (yourblog.com/wp-admin) and log in.
Welcome to your WordPress Dashboard! If your live blog (yourblog.com) is the front of the house—what your visitors see—then this dashboard is the backstage area.
And this is where the real magic starts. It might seem like just a menu screen now, but the first time you make a small edit here and then see it appear instantly on your live site... that's the moment it clicks. That feeling of joyful control, of knowing you built that, is what makes all the technical setup worth it. This is your space to create, safely and patiently.
From this dashboard, you can write posts, change your design, and manage everything. Your visitors will only ever see the beautiful final result.
For now, just dive in and click on "Appearance" > "Themes" to start browsing free designs. My best advice? Don't aim for perfection. Just pick one that feels right to you—you can always change it later! The goal right now is to explore and have fun.
You Did It!
Seriously, take a moment. You’ve just successfully installed the software that powers over 40% of the entire web. You are no longer just someone who wants to start a blog; you are a blog owner.
The technical barriers are officially behind you. Now comes the most rewarding part: creating content and connecting with your audience.
Ready for your next steps? Check out our foundational guide: "The 2025 Stress-Free Guide to Starting Your First Blog" to plan your content and start growing your audience.